thrifted shirt and a ridiculous amount of incredibly twee and slightly creepy fabric
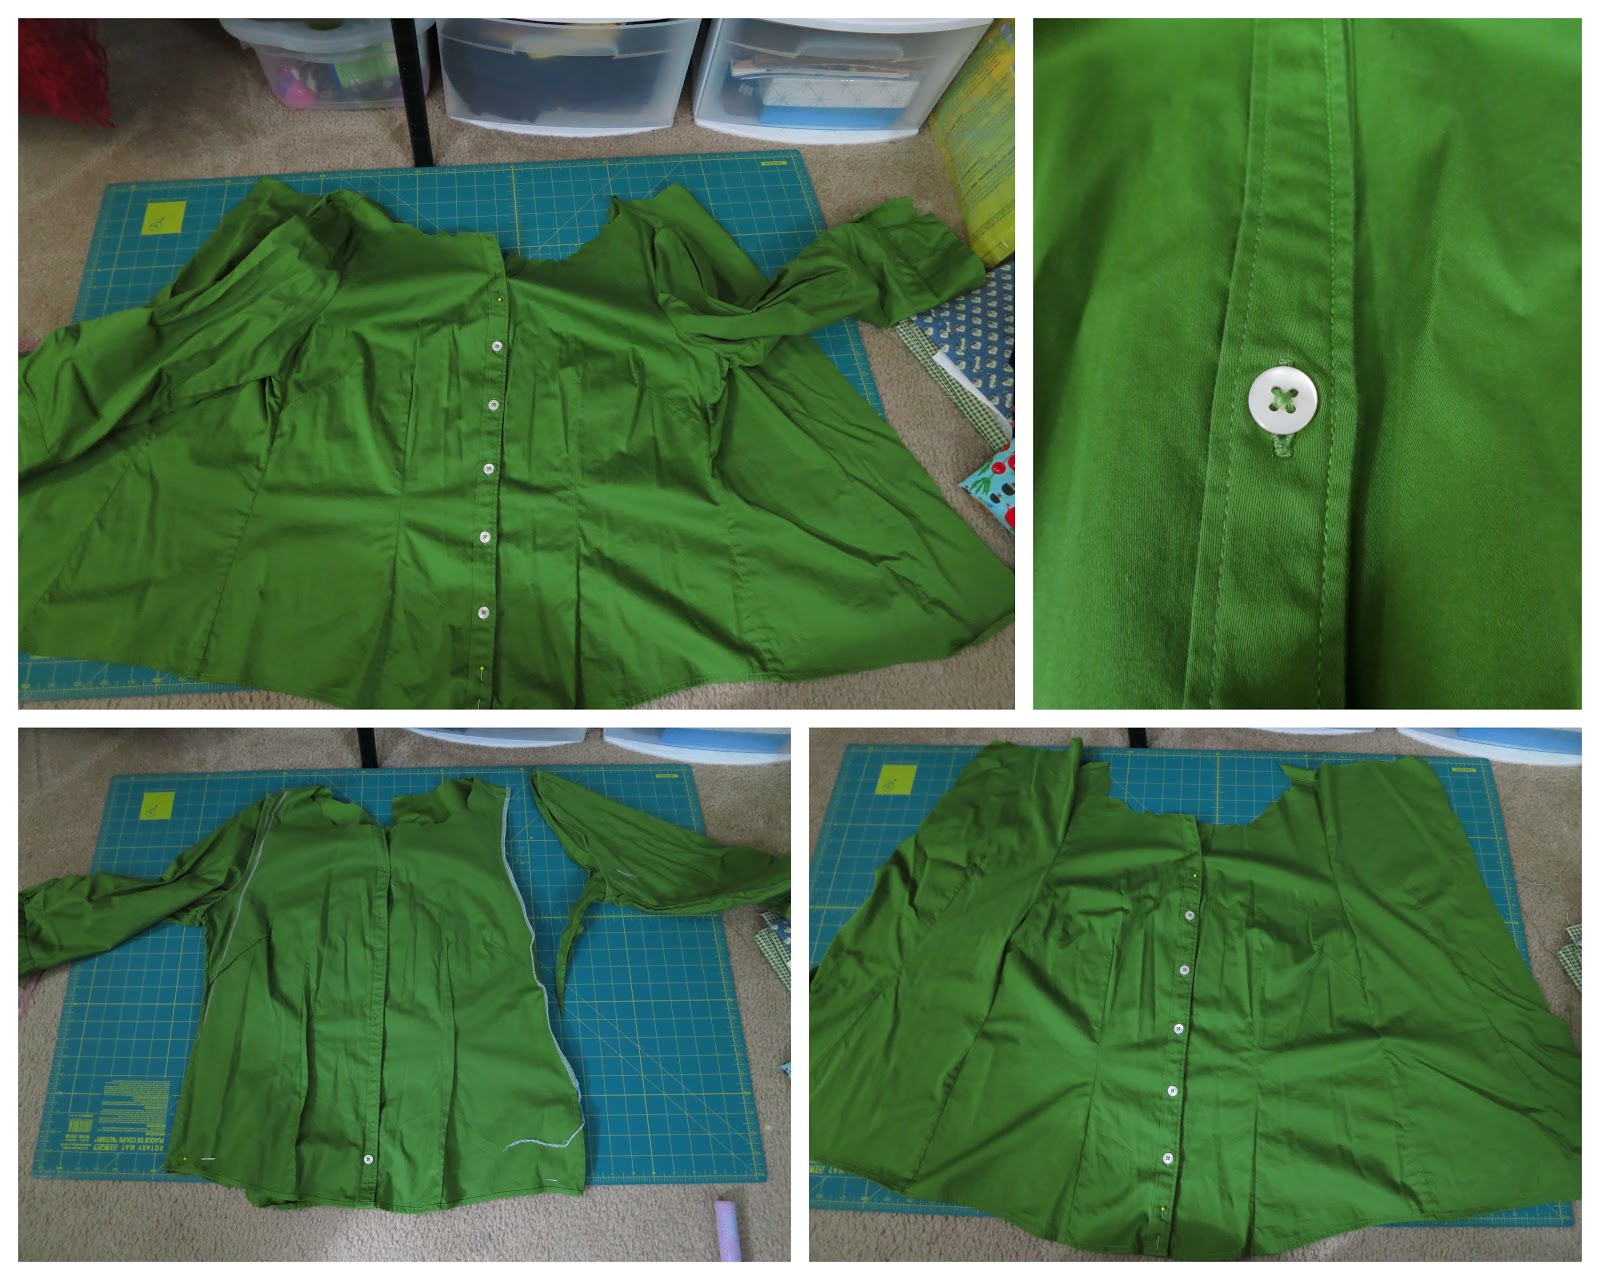
first step is to cut straight up the back of the shirt. i removed the collar as well, but that was an after thought. i nearly cut through it but then thought i would add it to my fabric
stash hording pile for some future project that will probably not happen. sew the button placket closed and then flip the shirt inside out; sleeves included.
the third picture you can see where i marked a straight line from the shoulder down to the waist, all but removing the sleeves and armscyes. i marked this after aligning and pinning the bottom hem, and pulling the shoulder seam taut. and you can see my super high tech sidewalk chalk. no expensive sewing chalk for me. serge along the chalk line and open shirt back up, cutting open shoulder seams if necessary to lay flat.
a more experienced wiser sewist would iron stuff at this point. or well prior. i dont iron if at all possible.
serge the sides and do a quick rolled hem. then determine how long the apron will be [mine is a completely arbitrary 17"] and serge across the top. admire how it looks all nice with finished fray-free edges on both the front and back. pat self on back.
cut a 20"x5" rectangle and two 5"x6" pockets. then gather the top edge to fit within the large rectangle with 1/4" leeway on each side. pin the crap out of it, sew the bottom side down [make sure the creepy veggies will be right side up!] and then fold over the waistband as if you were using gigantic bias tape. be sure to fold the serged edge under as well so the front looks finished.
i basically matched up the front and back [folded over the gathered skirt portion] and sewed a line right over the previously sewn back seam. i also sewed a quick seam across the top so the waistband would lay flat since lazy me didnt use interfacing.
lay out your pockets and pin in place. since the green fabric was previously a shirt, i used the boob darts as place markers and aligned the pockets with them. then the most pain-in-the-ass [and time consuming] part. cut two 20"x3" strips of fabric and serge the long edge, right sides together, and one end. then turn the fabric tubes right side out and attach to the waistband.
if you left enough room at the ends in previous steps, it should be easy to tuck in serged edges, pin the ties, and sew shut. i unpicked a few stitches and of course since i backstitch by sheer habit, those few stitches were slightly north of a goddamn hassle.
and just cos its hilarious... yours truly modeling the apron. 1950's angry housewife style. yes that is a rolling pin.
*edit - i made another after posting this. it took me an hour. and not just cos it only has one pocket. since i basically mucked about figuring out what i was doing [and pausing for pics] it took me much less time the second attempt. learning curve and whatnot. but another unworn thrifted shirt put to good use!


I LOVE the info would have been MUCH MUCH BETTER withOUT the cursing.
ReplyDeletethank you! and well.. compared to how i speak in real life... this is incredibly tame. but if it offends you, you may want to consider reading a different blog.
Deletewell I will be reading a different blog...that was a rude response to a reader you just gave...learn some manners
DeleteLove the info AND the cursing! lol
ReplyDeleteme too!!!
DeleteThat is an awesome apron! And haha, I enjoyed how you typed it up (and your angry housewife pose!) XD
ReplyDeleteThis is great. I giggled at your cursing. I am known to have a foul mouth.
ReplyDeletethank you for this great tutorial!you did a beautiful job.im going to try making me one!
ReplyDeletei loved this.... all of it.. i whipped up a cover for my high dollar machine and serger this past week all from scraps they are so cute and useful and i will make one of these today thank you so much
ReplyDeletei am teaching a 13 yr old how to sew and she loves it.. we have about 1/2 of a quilt top done from arm hold cuts from the arm whole cuts of the pillow case ..little dresses for africa.. it is so cute and colorful... and i am thrilled she and her mom are both learning and they are thrilled also..
Thank you for explaining so well. You had me laughing out loud, over something as boring as sewing!! Great job! Don't sweat the haters.
ReplyDeleteThanks for the great tutorial! And also, thanks for showing that you dint have to be perfect! I love your mild cussing. I sure do a good bit while working on a project!
ReplyDeleteSympa et très joli ce tablier, belle idée.
ReplyDeleteGreat apron. Loved the description, laughed all the way through - loved the angry housewife photo!!!
ReplyDelete